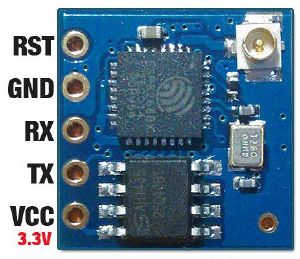
ESP-05
Jump to navigation
Jump to search
ESP8266 ESP-05 WiFi Transceiver Module
The 5 pin version of the ESP8266 Esp-05 WiFi module has the following connections on the 5 pin header:
Reset - active low reset (apply low voltage level to reset), EXT_RSTB pin 32 on ESP8266 chip
GND - GND or 0V of power supply
Rx - UART receive pin (3.3V logic level)
Tx - UART transmit pin (3.3V logic level)
Vcc - 3.3V power supply Vcc connection
There is an antenna connector at the top left of the board for an external aerial/antenna. An additional GND connection can be found at the top right of the board.
Operating Voltage

The ESP8266 chip and ESP-05 module operate at a voltage of 3.3V (working range is 3.0V to 3.6V). I/O pins including the UART pins operate with 3.3V logic. The chip and module I/O and UART pins are NOT 5V tolerant.
Current Consumption

An operating current average value of 80mA is given for the EXP8266 chip in the datasheet. The ESP8266 SDK getting started guide gives the following note for their evaluation board modules: The ESP8266 Wi-Fi module needs 3.3V power supply and may draw current in the order of 500mA.

Note that this current value is for the Espressif modules and not the ESP-05, but it does give some idea of the current that some modules can draw. The following current consumption values are for the EXP8266 chip when transmitting and receiving. These are the highest typical values from the datasheet.
Transmit Current: highest typical current consumption of 170mA under the following conditions (Tx802.11b, CCK 11Mbps, P OUT=+17dBm)
Receive Current: highest typical current consumption of 56mA under the following conditions (Rx 802.11g, 1024 bytes packet length, -70dBm)
Espressif ESP8266 Chip Information

Further information on the ESP8266EX chip used on the ESP-05 module can be found on the Espressif ESP8266EX resource page. Test the ESP8266 ESP-05 WiFi Transceiver Module using the article on ESP8266 testing shows how to perform some basic tests on the Esp-05 module to see if it is working. An Arduino is used to do the testing.
Arduino UNO
Sujungimas
- Arduino 3.3V -> VCC
- Arduino Digital 2 -> TX
- Arduino Digital 3 -> RX
- Arduino GND -> GND
Patikrinimas
#include <SoftwareSerial.h>
#define DEBUG true
String readStr;

// Nustatymai
//TX pin 2, RX pin 3
SoftwareSerial esp8266(2, 3);

void setup() {
  Serial.begin(115200);
  esp8266.begin(115200);
  delay(100);
  esp8266.println("AT");
  while (!esp8266.available()) {  };
  readStr = esp8266.readString();
  Serial.print("Echo:" + readStr);
  if ( readStr.indexOf("OK") > -1) {
    Serial.println("AT Command Connection : OK");
  };
}

void loop() {
}
Paprastas web serveris
#include <SoftwareSerial.h>
#define DEBUG true
#define BUFFER_SIZE 128

boolean FAIL_8266 = false;
char buffer[BUFFER_SIZE];
String readStr;

// ################# Nustatymai ###########
//TX pin 2, RX pin 3
SoftwareSerial esp8266(2, 3);
String SSID = "wifi_ap";
String PASSWORD = "wifi_pass";
// ########################################


String strHTML1 = "<!doctype html>\
<html>\
<head>\
<title>arduino wifi</title>\
</head>\
<body>\
<H1>Welcome :)</H1>";
String strHTML2 = "</body>\
</html>";

void clearESP8266SerialBuffer();
bool JoinAP();
void sendESP8266Cmdln(String, int);

void setup()
{
  Serial.begin(115200);
  // it default runs at 115200
  esp8266.begin(115200);
  // we need to override to 9600 to clear the unknown characters
  esp8266.println("AT+UART_DEF=9600,8,1,0,0");
  esp8266.begin(9600);
  do {
    //Wait Serial Monitor to start
    while (!Serial);
    Serial.println("--- Start ---");
    esp8266.println("AT+RST");
    delay(100);
    readStr = esp8266.readString();
    if ( readStr.indexOf("OK") > -1) {
      Serial.println("Module is ready");
      esp8266.println("AT+GMR");
      delay(1000);
      clearESP8266SerialBuffer();
      esp8266.println("AT+CWMODE=1");
      delay(2000);
      //Quit existing AP, for demo
      Serial.println("Quit AP");
      esp8266.println("AT+CWQAP");
      delay(1000);
      clearESP8266SerialBuffer();
      if (JoinAP())
      {
        Serial.println("CWJAP Success");
        FAIL_8266 = false;
        delay(3000);
        clearESP8266SerialBuffer();
        //Get and display my IP
        sendESP8266Cmdln("AT+CIFSR", 1000);
        //Set multi connections
        sendESP8266Cmdln("AT+CIPMUX=1", 1000);
        //Setup web server on port 80
        sendESP8266Cmdln("AT+CIPSERVER=1,80", 1000);
        Serial.println("Server setup finish");
      } else {
        Serial.println("CWJAP Fail");
        delay(500);
        FAIL_8266 = true;
      }
    } else {
      Serial.println("Module have no response.");
      delay(500);
      FAIL_8266 = true;
    }

  } while (FAIL_8266);
  //set timeout duration ESP8266.readBytesUntil
  esp8266.setTimeout(1000);

}

void loop() {
  int connectionId;

  if (esp8266.readBytesUntil('\n', buffer, BUFFER_SIZE) > 0)
  {
    Serial.println("Something received");
    Serial.println(buffer);
    if (strncmp(buffer, "+IPD,", 5) == 0) {
      Serial.println("+IPD, found");
      sscanf(buffer + 5, "%d", &connectionId);
      Serial.println("connectionId: " + String(connectionId));
      delay(1000);
      clearESP8266SerialBuffer();

      sendHTTPResponse(connectionId, strHTML1);
      sendHTTPResponse(connectionId, "<hr/>-END-<br/>");
      sendHTTPResponse(connectionId, strHTML2);

      //Close TCP/UDP
      String cmdCIPCLOSE = "AT+CIPCLOSE=";
      cmdCIPCLOSE += connectionId;
      sendESP8266Cmdln(cmdCIPCLOSE, 1000);
    }
  }

}


void sendHTTPResponse(int id, String response)
{
  String cmd = "AT+CIPSEND=";
  cmd += id;
  cmd += ",";
  cmd += response.length();

  Serial.println("--- AT+CIPSEND ---");
  sendESP8266Cmdln(cmd, 1000);

  Serial.println("--- data ---");
  sendESP8266Data(response, 1000);
}


boolean JoinAP()
{
  String cmd = "AT+CWJAP=\"" + SSID + "\",\"" + PASSWORD + "\"";
  esp8266.println(cmd);
  return waitOKfromESP8266(10);
}

//Send command to ESP8266, assume OK, no error check
//wait some time and display respond
void sendESP8266Cmdln(String cmd, int waitTime)
{
  esp8266.println(cmd);
  delay(waitTime);
  Serial.println(esp8266.readString());
  clearESP8266SerialBuffer();
}


boolean waitOKfromESP8266(int timeout)
{
  do {
    Serial.println("wait OK...");
    delay(1000);
    if (esp8266.find("OK"))
    {
      return true;
    }

  } while ((timeout--) > 0);
  return false;
}

//Clear and display Serial Buffer for ESP8266
void clearESP8266SerialBuffer()
{
  Serial.println("= clearESP8266SerialBuffer() =");
  while (esp8266.available() > 0) {
    char a = esp8266.read();
    Serial.write(a);
  }
  Serial.println("==============================");
}

//Basically same as sendESP8266Cmdln()
//But call ESP8266.print() instead of call ESP8266.println()
void sendESP8266Data(String data, int waitTime)
{
  //ESP8266.print(data);
  esp8266.print(data);
  delay(waitTime);
  clearESP8266SerialBuffer();
}
